(Disclaimer: This post may contain affiliate links. For more information, please see Disclosure Policy.)
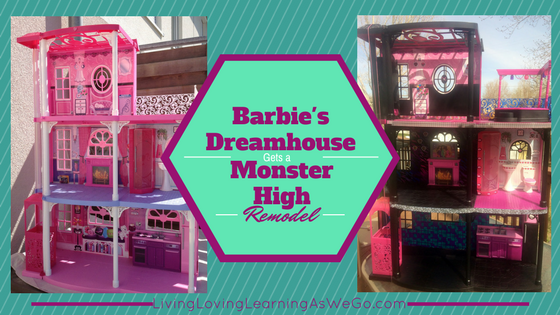
At some point in the last few years we hit a point where Barbie was out and Monster High was in. Now almost any parent of little girls can attest to the sheer amount of stuff Barbie has, not to mention the cost along with them. When Skye seemed to have stopped with the Barbies all together and was fully entrenched in Monster High mania, I knew I had to do something to repurpose at least some Barbie stuff instead of just packing it away. The obvious choice was the Barbie 3-story Dream Townhouse we already had, but you can use whichever version you have or can get. It was a present from Grandpa not that many birthdays ago and it’s not something to just easily be packed away in a closet somewhere. So the transformation process began…
 I bought Monster High Stickers, MH tapefitti, decorative duct tape, and various colors of spray paint (black, pink, purple, turquoise), trying to stick to patterns and colors that go along with a couple of my daughter’s favorite characters.We even had random leftover stickers from birthday party goodie bags and a couple of her books, so we tracked those down too.
Starting with covering the whole inside with leftover packing paper, removing the side door and railing, and taping over windows with painters tape to try to avoid paint where I didn’t want it, I then started with painting the entire “outside” of the house black.  At this point, it was left to sit over night to allow the paint to completely dry.
Then, after carefully removing all the paper and tape, it was time to plan the decor for the inside of the house. Using more of the leftover packing paper, I began carefully covering the inside walls and edging along the floors with tape, much the same way as painting an actual room in a house. Once everything in the background was well covered, I began to repaint the floors on each level of the house. The first level became black, the second, was half black and half hot pink, and the top level became hot pink. It was left over night again at this point to let it dry thoroughly.
The columns along the front of the house holding up the floors were a bit tricky, as was the elevator. Once the floors were dry, I used more scrap leftover packing paper to cover the floors and inside walls again, and worked my way carefully around each of the pillars painting them black. Some extra painters tape at the base of each of the columns helps to catch any dripping paint that could get past the edges of the scrap paper. And then it was left again to dry for awhile.
 This is where the fun, and difficult positioning, begins! I started at the bottom and worked my way up, but
  working down from the top will work just as well. Using the first duct tape choice, a purple and turquoise pattern, I began to line strips across the wall just like wallpaper. A box cutter worked well to trim edges along the corners and around windows. There was a lot of guesswork to get the right lengths of strips of tape, but eventually it comes together nicely. I continued until the whole back wall of the first floor was covered, then chose the next decorative tape and repeated the process for the second floor. The second floor got a multicolored purple, blue, black, zebra stripe-like print that reminded us of Clawdeen.
 The top floor had a little bit of a different process. Skye wanted to keep some of the wall background on that floor so I carefully taped off everything she wanted to stay (the top wallpaper, the mirror, a small nightstand with a lamp on it, the plug for the lamp, that kind of stuff), then taped it off horizontally across the middle to give the wall two different colors. This room was specifically for Draculaura, so it had to be black and pink. That was a given.
While the top floor walls were drying, I moved back to the “outside” of the house to give it some fun trim. This is where the tapefitti really came in handy. It fit perfectly along the edges along the different sections, but still gave it a fun, Monster High personality. Next was the fun part. Moving back to the first and second floors, I began using the stickers and tapefitti to decorate the house. There were stickers that had characters in what looked like picture frames perfect for the wall and candles in candle holders. I found tapefitti with lips that went perfect with some stickers with lips and fangs that I used to give the bathroom a theme. I used more tapefitti to edge the floors along the front of the house and along the wall where it meets the floor in some rooms. There are so many ways to go with a remodel like this, but the most important thing is to have fun, get inspiration from your child’s favorite characters, and make it personal. I even went ahead and made sure the jacuzzi  tub matched too!
This was a bit of a lengthy remodel, but completely worth it for the extra years of use the Barbie Dreamhouse would get. And my daughter’s face after the big reveal was priceless. Next remodel I’m thinking the Barbie Vacation House…

What about you? How have you found ways to give your kids’ toys new life when they’ve started to outgrow them?
(Disclaimer: This post may contain affiliate links. For more information, please see Disclosure Policy.)
If you come across any broken links or resources no longer available, leave a comment on Facebook and I will get them fixed as soon as I can. Thanks!